Nintendo Switch Joy-Con Drift is probably the most talked about controller problem in gaming history. Your character walks by itself, your camera spins without touching anything, and menus scroll on their own. Nintendo even faced lawsuits over this exact issue, so if your Joy Con drifts, you are dealing with a known, widespread problem, not something wrong with just your unit.
This guide covers every fix that actually works, from the free five minute tricks to the deeper repair options for when nothing else helps. No filler, just what actually solves the problem based on real repair experience and testing.
How to Confirm You Actually Have Drift
Before trying anything, check the Switch’s built in test screen so you know for certain you are dealing with real drift and not something else, like a dirty screen protector interfering with handheld mode.
Steps to Check on the Console Itself
- Go to System Settings from the home menu
- Scroll down and select Controllers and Sensors
- Select “Test Input Devices“
- Choose the Joy Con or Pro Controller you want to test
- Watch the on-screen stick position while your thumbs are completely off both sticks
If the dot on screen sits perfectly still in the center, there is no drift right now. If it wanders on its own even slightly, that confirms the problem.
You can also test using a browser based gamepad tester if the Joy Con is connected to a PC, which shows the exact numeric stick position rather than just a visual dot, giving you a more precise read on how bad the drift actually is.
Browser tools read analog stick movement through the Gamepad API.
Method One: Update Your Switch System Software First
This gets skipped constantly, and it should not be. Software bugs can sometimes create drift like symptoms that have nothing to do with the actual stick hardware.
Steps
- Go to System Settings
- Select System
- Select System Update
- Let the console check for and install any available update
While you are there, also check if a Joy Con firmware update is available, since Nintendo occasionally pushes small controller firmware improvements alongside system updates.
If drift disappears completely after updating, the cause was software related, which is honestly rare but always worth ruling out first since it takes only a couple of minutes and costs nothing.
Why Joy Con Sticks Drift So Much Compared to Other Controllers
Joy Con sticks use a small part inside that reads stick position, and this part is genuinely more prone to wear than many other controllers on the market. Repair technicians who specialize in Nintendo hardware often point to the physical design itself as the core issue, not just normal wear and tear.

Here is a simple breakdown of the common causes:
| Cause | Why It Happens |
|---|---|
| Weak internal design | The contact sheet inside wears down faster than sturdier designs used elsewhere |
| Dust and lint | The small size of Joy Cons means less sealing around the stick base |
| Constant handheld use | Portable play means more exposure to pocket lint, hand oil, and drops |
| Repeated full range movement | Games that need constant fast stick input wear the contact faster |
| Manufacturing tolerance | Some batches simply had tighter or looser tolerances than others |
A Nintendo repair specialist mentioned that Joy Con sticks tend to show noticeable drift far earlier than the analog sticks on Xbox or PlayStation controllers, largely because of the smaller, more delicate design packed into such a compact controller.
Method Two: The Classic Compressed Air Fix
This is the single most recommended first fix by nearly every repair community, and for good reason, since dust buildup causes a huge share of Joy Con drift cases.
What You Need
| Item | Purpose |
|---|---|
| Compressed air can | Blows dust and lint out from under the stick |
| Thin straw nozzle attachment | Directs air precisely into the small gap |
| Soft cloth | Wiping the outer shell afterward |
Steps to Follow
- Hold the Joy Con with the stick facing you directly
- Insert the thin nozzle right where the stick’s rubber base meets the plastic shell
- Spray in short one second bursts, never one long continuous spray
- While spraying, rotate the stick slowly in a full circle to loosen trapped debris
- Repeat from several different angles around the base
- Wipe down the outer shell with a soft cloth afterward
Many players report this alone completely stops their drift, especially on Joy Cons that have not been opened or cleaned before. It is free if you already own a can, and cheap if you need to buy one.
Common mistake: holding the can at an angle or upside down, which sprays cold liquid instead of air. Always keep the can upright during use.
Method Three: Clean the Stick Contacts With Alcohol
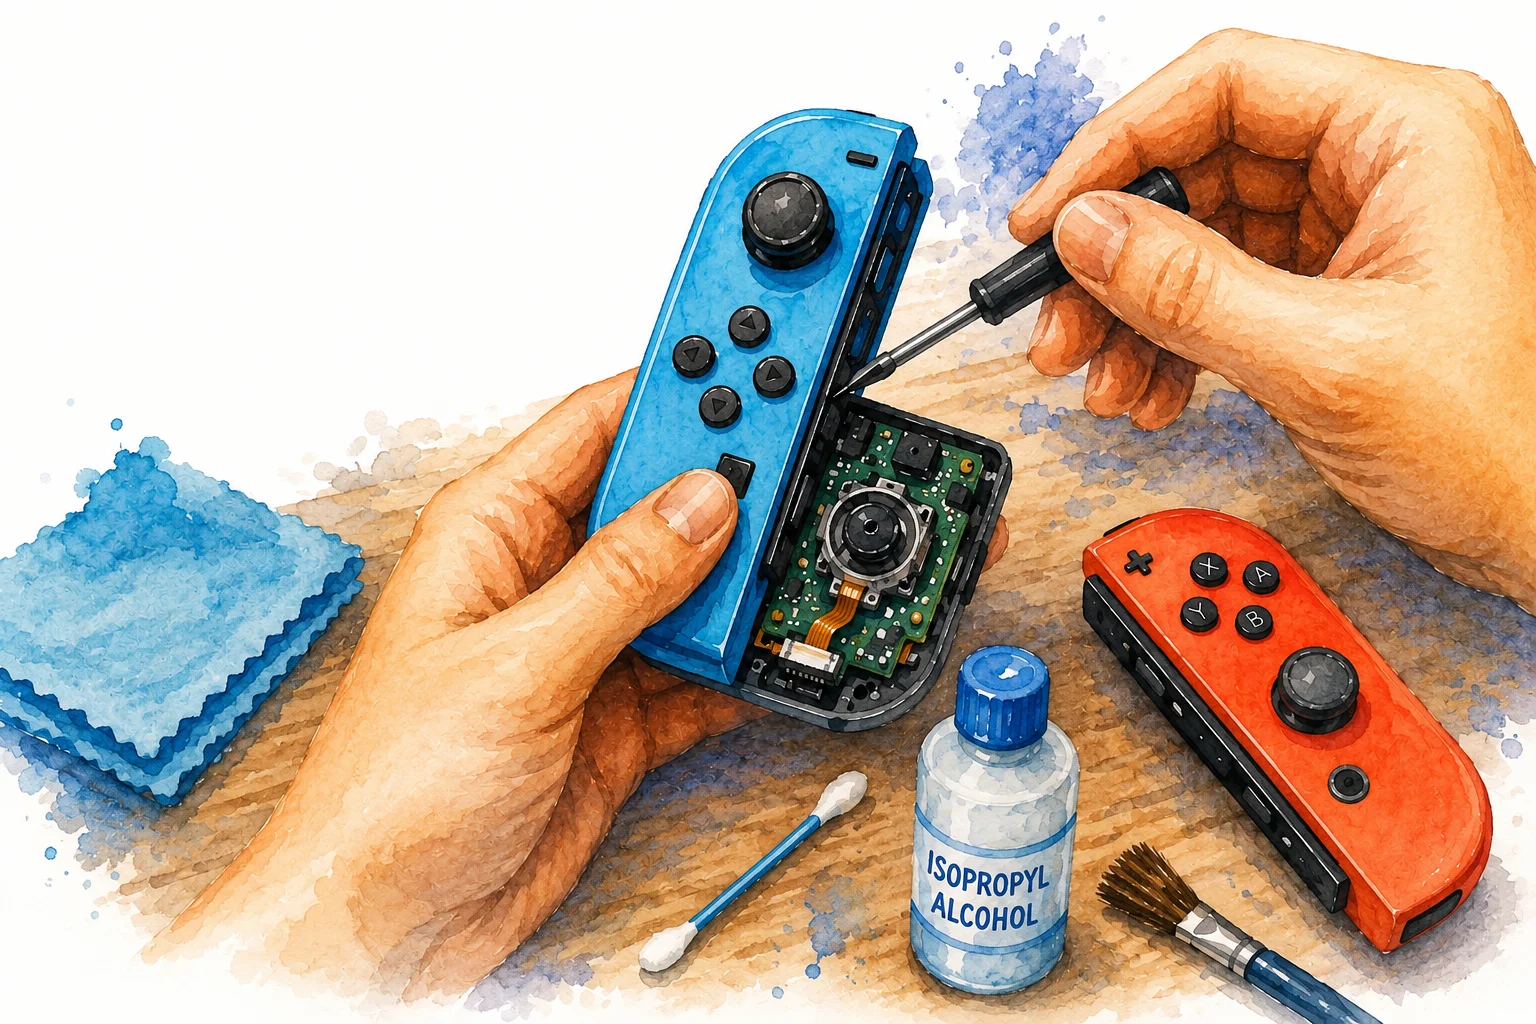
If compressed air alone does not fully solve it, going one level deeper by opening the Joy Con and cleaning the actual contact sheet usually finishes the job.
Tools Needed
| Item | Purpose |
|---|---|
| Isopropyl alcohol, 90 percent or higher | Cleans oxidation and built up grime |
| Cotton swabs | Precise application without excess liquid |
| Y00 tri-wing screwdriver | Opening the Joy Con shell, this specific screwdriver type is required |
| Small Phillips screwdriver | Removing the stick module itself once inside |
| Plastic prying tool | Separating the shell safely |
Steps
- Power off the Joy Con and detach it from the Switch or the controller grip
- Remove the four tri-wing screws on the back, keeping them together so none get lost
- Carefully pop the back shell open, there is a ribbon cable connecting the battery, so go slowly
- Disconnect the battery ribbon cable gently by lifting its small connector
- Remove the two screws holding the stick module in place, then gently pull the module up and disconnect its own ribbon cable
- Dip a cotton swab lightly in alcohol, not soaking wet
- Rub gently around the edges of the stick module where the metal contacts are visible
- Let it air dry for ten to fifteen minutes before reconnecting everything
This method has a moderate difficulty level. The tri-wing screwdriver is the biggest barrier for most people, since it is not a common tool everyone already owns, but it is cheap and easy to find online.
Common mistake: forgetting to disconnect the battery ribbon cable before removing other parts, which risks tearing it if the shell gets pulled apart too quickly.
Method Four: Replace the Analog Stick Module
When cleaning does not solve it, the actual stick module has likely worn out completely and needs replacing. This is genuinely the most reliable long term fix for Joy Con drift, and thankfully it does not require soldering like some other controllers, since Joy Con stick modules connect through a ribbon cable and small screws instead.
What You Need
| Item | Purpose |
|---|---|
| Replacement Joy Con stick module | The actual new part |
| Y00 tri-wing screwdriver | Opening the shell |
| Small Phillips screwdriver | Removing the old module and installing the new one |
| Plastic prying tool | Safe shell separation |
| Tweezers | Handling the small ribbon cable connector |
Steps
- Open the shell the same way described in Method Three
- Disconnect the battery ribbon cable first
- Remove the screws holding the old stick module in place
- Gently lift the module and disconnect its ribbon cable from the small connector on the board
- Connect the new module’s ribbon cable into that same connector, making sure it sits fully seated
- Screw the new module into place
- Reconnect the battery ribbon cable
- Close the shell and replace all four tri-wing screws
This fix has a genuinely high success rate since it replaces the actual worn part rather than just cleaning around it. Replacement modules cost a small amount and are widely available, and the whole process usually takes under thirty minutes once you have done it a first time.
The steps differ slightly between the left and right Joy Con, so a model-specific Joy Con joystick replacement guide can help you identify the screws, cables and internal parts.
If this feels intimidating, many local repair shops and even some Nintendo authorized service centers handle this exact repair for a modest fee, and turnaround times are often quick since it is such a common request.
Method Five: Use Nintendo’s Official Repair Program
Nintendo has publicly acknowledged the Joy Con drift issue and, in many regions, offers a free repair program specifically for this problem, even outside the normal warranty window in some cases.
Steps to Use This Option
- Go to Nintendo’s official support website for your specific region
- Look for the Joy Con drift repair section, sometimes listed under “Joy Con Repair” directly
- Enter your Joy Con’s serial number, found on the inside of the controller rail or on original packaging
- Follow the shipping instructions provided, which usually include a prepaid shipping label
Because of past legal pressure over this exact issue, Nintendo has extended free repair windows in several regions well past the standard warranty period specifically for drift complaints. It is always worth checking directly, even if you assume your warranty has expired.
This is often the easiest option for people who are not comfortable opening electronics themselves, since it costs nothing but your time and shipping wait.
Method Six: Try a Silicone Shim Fix as a Temporary Patch
This is a well known community trick that does not fix the actual worn part, but can reduce drift symptoms while you wait for a replacement module or repair shipping.
The idea is placing a very small piece of material, like a tiny bit of folded paper or a thin silicone shim, under the stick module to apply slight upward pressure, which sometimes improves contact with the worn sensor sheet.
Steps
- Open the shell as described in Method Three
- Locate the stick module and its connection point to the circuit board
- Cut an extremely small piece of thin material, roughly matchstick head sized
- Place it carefully under one edge of the module where it meets the board
- Reassemble and test using the console’s built in test screen
This is genuinely a temporary patch, not a real fix, and it does not work for every drift case. Think of it as a stopgap measure rather than something to rely on long term.
Method Seven: Adjust In Game Deadzone Settings as a Backup
Similar to other controllers, some Switch games allow small deadzone adjustments, though this is less common on Switch compared to PC gaming.
- Check the specific game’s control settings menu for a stick sensitivity or deadzone option
- If available, increase it slightly, just enough to ignore small unwanted drift movement
- Test immediately after each adjustment, since setting it too high makes precise aiming feel sluggish
Not every Switch game offers this setting, so this method works only situationally, but it is worth checking when it is available as a way to keep playing while you plan a proper fix.
Comparing All Seven Methods
| Method | Difficulty | Cost | How Reliable |
|---|---|---|---|
| System software update | Very easy | Free | Low, only fixes rare software cases |
| Compressed air cleaning | Very easy | Low | Medium to high |
| Alcohol contact cleaning | Medium | Low | High |
| Stick module replacement | Medium | Low to medium | Very high |
| Nintendo official repair | Very easy | Free in many cases | Very high |
| Silicone shim patch | Medium | Very low | Low, temporary only |
| Deadzone adjustment | Very easy | Free | Temporary workaround only |
Common Mistakes People Make Fixing Joy Con Drift
A number of small errors turn an easy fix into a frustrating one.
- Using a regular Phillips screwdriver instead of the correct Y00 tri-wing screwdriver, which can strip the tiny screws
- Pulling the shell apart too fast and tearing the delicate battery ribbon cable
- Using too much alcohol, letting it seep into the ribbon connector area
- Forgetting to fully reseat ribbon cable connectors, which causes the Joy Con to not respond at all afterward
- Assuming a new stick module needs soldering, which it does not, leading people to avoid an otherwise simple fix
- Ignoring the free Nintendo repair program because they assume their warranty has already expired
Preventing Joy Con Drift From Coming Back
A few habits genuinely delay the return of drift, even though the small design means it will likely happen again eventually.
- Clean around the stick base with compressed air every couple of months as routine maintenance
- Avoid keeping the Switch loose in a pocket with lint producing fabric, use a case instead
- Try not to slam the stick fully to its edge repeatedly during fast paced games
- Keep hands clean and dry before long handheld sessions to reduce oil buildup
- Consider alternating between two sets of Joy Cons if you play daily for many hours, splitting wear between units
Testing Your Fix Properly
After any repair attempt, always retest using the console’s built in test screen or a browser based gamepad tester rather than judging by feel in a game.
- Leave both sticks completely untouched for thirty seconds while watching the test screen
- Move each stick in slow full circles, checking it returns to true center every time
- Push to each of the eight directions and confirm the on-screen indicator reaches the full edge cleanly
- Wait a few hours and retest, since some drift only reappears once the Joy Con warms up from handheld use
If the stick passes consistently across multiple tests spread across a few hours, your fix worked. If small movement still shows up, go back one method and try the next step up the list.
Frequently Asked Questions
Does Joy Con Drift Happen to Both Sticks Equally?
Ans: Not usually. Most people report the left stick drifting more often than the right, though this can vary depending on which games you play most and how you naturally hold the controller.
Can I Still Get Free Repair If My Joy Con Is Years Old?
Ans: In many regions, yes, since Nintendo’s drift specific repair program has extended past the standard warranty window because of the widespread nature of this issue.
Is Buying a Whole New Joy Con Cheaper Than Repairing the Old One?
Ans: Usually not, since a replacement stick module costs much less than a full new Joy Con, and the repair itself does not require soldering.
Do Third Party Joy Con Style Controllers Have the Same Drift Problem?
Ans: It depends heavily on the brand and the internal part quality, but many budget third party pads use similarly cheap components and can drift just as quickly or faster.
Can Extreme Cold or Heat Make Joy Con Drift Worse?
Ans: Yes, temperature changes can affect internal materials slightly, and some players notice drift becomes more noticeable after the Switch has been sitting in a hot car or a very cold room.
How Long Do Joy Cons Typically Last Before Drift Starts?
Ans: This varies a lot, but many users report first signs somewhere between six months and two years of regular handheld use, with heavier daily players seeing it sooner.
Will a Screen Protector or Grip Case Reduce Drift Risk?
Ans: A grip case can reduce lint and dust exposure slightly, which may delay drift a little, but it does not protect the internal stick module from wearing down over time.